Here is your complete guide to horse clipping. This grooming skill is art, science, and practice. The primary reasons to body clip or trace clip your horse are their comfort and health. Focus on the health aspects first, and the shiny bloom and show-stopping turnout will come.
This guide to horse clipping may seem overwhelming – but take it one section at a time. Here, learn how to clip your horse – clippers, blades, techniques, troubleshooting, and even how to train your horse to love the clippers.
I’ve also peppered this guide with handy shopping links. As an Amazon Affiliate, I earn from qualifying purchases at zippo extra cost to you. This helps me keep this website up and running.
Clipping is optional!
Rules for Horse Clipping
- Follow these general clipping rules, and your horse will be gorgeous, and you’ll be a master in no time flat.
- Clipping is excellent for some horses, but not all horses or situations.
- You don’t have to do a full-body clip or even some pattern you see in a drawing.
- There’s no reason to clip close to the skin if you don’t want to. It’s possible to take a little bit off the top.
- Body clipping a horse takes practice.
- Don’t worry – it grows back.
- When in doubt, add more oil. Keep adding oil. Clipper oil is your friend. Like your best clipping friend ever.
- Please, for the love of all things horses, save the directions and manual for your clippers. The manual has tips for troubleshooting and arranging for clipper service.
Why Would You Need to Body Clip Your Horse?
- There are two general scenarios when body clipping is appropriate for horses.
- One, when you can improve their comfort. Does the weather match the coat they have?
- Two, to help with health, most specifically skin health. Rain rot, mud fever, and other skin issues can amplify when the hair traps moisture.

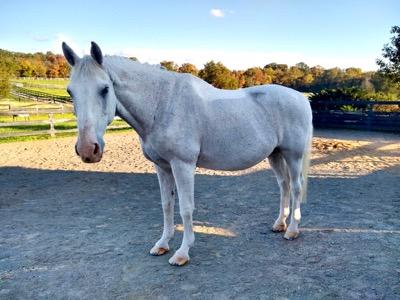
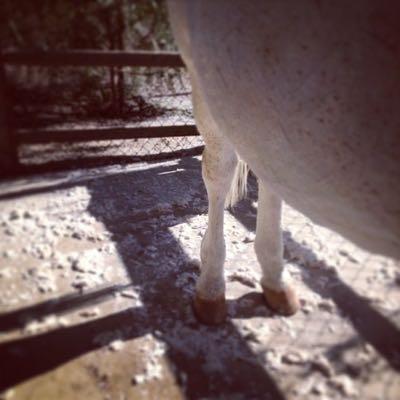
Fuzzy legs!
Clip your horse when their hair coat doesn’t match the climate.
- While it’s commonly thought that climate and temperature dictate how much hair a horse will grow, it’s the amount of daylight hours. When the days get shorter in winter, all creatures know to start packing on some pounds and growing hair. This magic happens in Canada; it also occurs in the South.
- The climate around you may not match what your horse grows! Clipping is a thoughtful way to help them stay comfortable in their surroundings. A Fjord horse living in the South will still grow a coat to protect against the Scandinavian winter. Help them out by clipping!
- Some breeds with naturally thick coats may need clipping all year long. The same is valid for horses with metabolic issues like PPID (Cushing’s disease), trouble shedding, eye problems, and other hair growth issues.
Would I clip this horse that’s sweating too much for the climate and training program? You betcha.
Clip when your horse needs help thermoregulating
- When an exercise or training routine creates excessive sweat, clipping can help with grooming and thermoregulation.
- A sweaty horse in winter has a few issues to deal with. One, they may teeter on the edge of overheating. A few studies have researched clipped and unclipped horses while exercising. One study discovered that clipped horses maintained their vitals well, while unclipped horses had longer exercise recovery rates.
- Another study that analyzed clipped and unclipped trotters found that the clipped horses showed less strain on the body’s activity to thermoregulate and could exercise more efficiently.
- A sweaty horse in winter also has to deal with a longer drying time. It may take longer for their heart and respiratory rates to return to normal, and drying can take forever. Cooling-out takes longer, and you must protect your horse from a chill.
***PRO TIP*** Check your horse’s vital signs before and after exercise to objectively track their recovery. Over time, this will give you an idea of whether their hair is too thick for their activity level.
Clip to improve your horse’s skin health
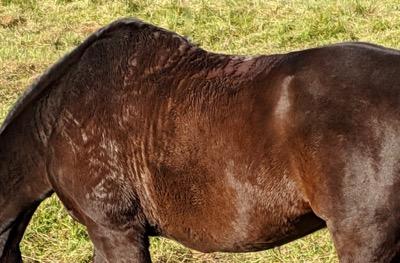
- Consider clipping if there’s a history of skin infections, like equine pastern dermatitis (EPD), rain rot, mud fever, matted hair, sores, or other weird skin funk.
- Long hair on some horses is the perfect storm for a skin issue. Hair traps moisture, dirt, sweat, dander, mud, and sometimes lice and mites. It can be a petri dish for your horse’s next science experiment.
- You can see the skin, clean the skin, and medicate it much more comfortably without a forest of hair.
- In other cases, you may find that your tack will pull and snag longer hairs. This is common in the bridle and girth areas. Longer hair can also be abrasive under tack as it moves back and forth. Some horses do better with a trim in the elbows and behind the ears to stop longer hair from pulling.
Read more about mud fever and EPD here.

This horse has equine pastern dermatitis. Topical medications reach the skin better when there’s no hair to gunk things up! Too much hair can also trap bacteria and moisture, a huge culprit of EPD.
The Benefits of Full-Body Clipping
- Body clipping may make grooming more manageable, making your horse look sleeker. It’s common for show horses to be clipped all year. This practice gives your horse a polished look as they enter the show ring if that is your particular jam.
- Full body clipping is often much easier to do than a pattern. You are not worrying about lines and transitions; you just take it all off.
- Body clipping may not suit horses in colder climates, as their entire body is naked, legs included. There are not any blankets that cover the legs (yet). Just something to think about.
Trace Clipping – The Different Clipping Patterns
- Traditionally, trace clipping is a thoughtful hair removal technique based on a pattern.
- You can target specific health concerns and address sweaty areas without a body clip.
- You may also hear the phrase chaser clip to refer to a generic trace clip, and for the context of this guide to horse clipping, consider all specialized clips to be a variation of the trace clip.

This horse has a half-face clip and blanket clip.
Trace clipping styles
- Trace clips are fantastic for horses in light work, as they allow for proper thermoregulation and prevent excessive sweating. Sometimes, a horse in medium or heavy work will fare well with a trace clip, depending on the weather. Always make clipping situational and help your horse; trace clips are an excellent option for a full clip.
- Here are some popular types of horse clip styles:
Bib Clip
This minimal style removes a tiny stripe of hair from the throat latch, down the neck, and into the area between the front legs.
The strip clip
This style takes the bib clip further by extending the clipped area to the udders or sheath.
The Irish clip
This style sports a half-face, which uses the cheek pieces of a bridle or halter as a guide. The hair in front of this line remains, while the cheeks and jaw are clipped. Additionally, there is a line from the poll to the stifle, with all hair below (except the legs) clipped away.
Trace clip
The traditional trace clip is a more comprehensive bib clip combined with a horizontal line from the point of the shoulder to the top of the gaskin. Everything below that line is clipped except for the legs. There may be an upswing over the flank where the hair changes direction.
Blanket clip
A blanket clip is a larger trace clip. Here, you’ll clip a half-face, all of the neck, and most of the body. The legs remain, as does a big patch of hair over the loins and rump shaped like a quarter sheet.
The hunter clip
The hunter clip is your horse’s entire body being clipped, except for a saddle pad-shaped area and the legs.

There are SO MANY variations of clipping patterns. Give your horse a personalized design.
Design a custom trace clip
- It’s much better for your horse if you clip the parts that get the sweatiest and leave the rest. Doing this may look similar to one of the trace clip patterns; it may look like Swiss cheese. Every horse will have a signature!
- Familiar places for horse sweat are the neck, the stifles, the butt cheeks, around the elbows, and up the flanks. Trimming any or all of these locations would make a delightful and custom clipping pattern for your horse.

Trimming Your Horse Without Clipping
- Trimming is the fine art of tidying your horse’s stray and wispy hairs for a polished look.
- Just using a pair of trimmers here and there achieve a few goals. Your horse will look spiffy. You will be able to feel the skin better in areas that you trim. Your horse’s tack may also fit better after trimming a bridle path.
Where to trim: ears, muzzles, bridle paths, and legs
Ears
- If you trim up your horse’s ears, you can trim the edges, the inside, or the outside. This tidy removes some sun and fly protection from your horse, so you must remedy that. To protect that skin, use fly bonnets when riding and fly masks with ears for everyday wear.
- The kindest ear trim only takes the wispy hair along the edges. You can fold the ear like a taco and buzz your trimmers down the edges for a tidy finish.
Muzzles
- Muzzles are usually trimmed for some disciplines and left to grow wildly in others.
- We know that a horse’s whiskers, called vibrissae, help your horse interact with their surroundings. Vibrissae are on the muzzle and around the eyes. They relay messages to your horse’s brain for spatial awareness as they can’t see under their chin, so the whiskers do that instead.
- Removing vibrissae will change how your horse can navigate their environment.
- Clipping whiskers is banned in some countries and within some show organizations and governing bodies like the FEI.

The bridle path
- Bridle paths, for most horses, are a must. They serve a specific purpose – helping your horse’s tack fit properly. The bridle path allows the crown piece to rest evenly on your horse’s poll. Otherwise, there is a lump that puts uneven pressure on their noggin over the poll.
Legs and Fetlocks
- Leg trimming is one way to tidy things up. Running your trimmers down the leg can tidy up those longer stray hairs around fetlocks, hocks, knees, and elbows. This technique may make grooming more manageable, making your horse look sleeker.
- You can remove all, most, or some of the leg hair depending on the blade and the clipping technique you use. Skimming your trimmers down the leg for a simple trim creates a neat profile.
Guide to Horse Clipping – When to Clip Your Horse
- Clip your horse when they need it. This usually happens in the fall as the horse’s winter coat comes in and in the spring as the haircoat is shedding. Or anytime you need to boost your horse’s comfort or health.
Consider these factors when deciding about clipping your horse:
- The climate you live in! How much do average daily temps work with or against their natural hair coat?
- Will you be going to shows and clinics? Starting earlier and clipping more frequently will help your horse look great for the show ring. There will be a little growth to touch up.
- Do they need help to shed, or is a metabolic disorder at play that makes their coat extra thick in the summer? There’s no rule about when you can clip.
- How sweaty do they become with their level of exercise? If you give your horse a holiday over the winter, perhaps there’s no need to clip, but it may help you as you ride in the fall and spring.
- Does your barn blanket “as needed” – or wait until a specific date for blankets to be allowed? You may want to postpone clipping until after this date.
- What’s the footing and rolling situation for your horse? Thick winter coats are wonderfully skilled at trapping dirt and sand. Plan accordingly, as the clipping prep for these gritty coats is extensive, and you may want warmer weather to bathe before clipping.
- What sort of style of clip would benefit your horse?

These two fuzzy buddies need blankets – it’s THAT COLD. Would I clip them? No, mainly because getting them clean enough to have a proper and comfy clip would be impossible. When it’s freezing, there may not be any sweat to worry about!
Clip early or clip late?
- When winter is coming, do a complete body clip when your horse starts growing a winter coat hair.
- This timing lets the clip partially grow out, so when the coldest temps arrive, you still have the benefits of a clip, and your horse’s legs are protected. You may or may not need blankets.
- Or, clip when your horse has finished growing in most of their winter coat. This means you are clipping a thick coat and must find a way to bathe or meticulously groom your horse beforehand.
Or, clip early and late.
- There’s also an adaptive scenario, which I have been doing for years with great success.
- Do a complete body clip in the fall after some of the winter coat grows. The temps are just starting to be chilly, but it’s warm enough to bathe thoroughly before the clip.
- About two months later, the clip has grown as daylight hours have diminished. Then, do a trace clip, leaving legs and a belly stripe fuzzy for warmth. Blankets cover the rest.
- Because of the previous clipping, there’s about half a coat to remove, thickness-wise. The shorter hair makes prep work and the actual clipping much easier.
- In different climates, make changes accordingly. Warmer temperatures might prompt you to body clip once or twice. Horses in less work might need one clip during the fall, and what grows back should be enough to carry them through the winter without excessive sweating during exercise.
Clipping in the spring
- You can clip in the spring, too. As a horse sheds, the weather may warm up faster than the hair can drop. Clip! Don’t worry about chopping off any of the summer coat coming in. It will even out. Your horse’s comfort comes first.
- Some horses shed unevenly, and you can clip to even things out. Clipping now is especially helpful if show season is starting for you.
- Springtime also brings mud into the mix, and a shedding horse and mud can be challenging to groom. Clipping makes the skin and hair easier to clean. You can also address skin issues that crop up when mud, wet, and spring temps mix, like mud fever.
- Horses with Cushing’s disease (PPID) often struggle to have an appropriate coat year-round. Many horses need regular body clips in all seasons to stay comfortable.
- You will still need to keep tabs on the weather, and you may be blanketing as needed. Your horse will keep shedding, too! It’s just with shorter hair.
- Let the weather and your horse’s coat be the guide to horse clipping.
Teach Your Horse to Love the Clippers
- You may find that your horse needs some training for safe clipping. Having a training system and routine in place long before you will be clipping is vital here. Nothing good happens when you try and train something in one go.
Use positive reinforcement horse training
- Here’s a positive reinforcement method that has worked with getting horses to love clippers. The secret to kind and successful horse training is to reward the good, the “try“, and create a union between the skill you teach and your horse’s positive experience.
The following must be true before you start training
- Your horse responds to a consistent reward you give them. It doesn’t have to be a treat. Scratches, rubs, and kind words also work.
- You don’t have a timeline or deadline, so start working with clippers long before you need to clip.
- You should start over with step one if you accidentally go too far one day and your horse reacts negatively with fear, confusion, or shutting down.
- Know if your horse can deal with cords. It might be overwhelming for a horse to adjust to cords and clippers simultaneously.
- Work on this for one minute a day. That’s all you need. Drilling things makes new scenarios worse. You can add time later as confidence grows.
Step-by-step instructions on how to train your horse for clipping
- I typically like to train a horse to tolerate the clippers when they’re not tied up. This freedom allows a horse to retreat and move slowly without fear of being trapped, which escalates panic.
- Use a halter and lead rope, and have your training sessions in a space your horse trusts. They already know that’s the place for positive handling, attention, and touch.
- Avoid rewarding unless your horse stands still or advances toward you and the clippers. Rewarding during a frightening moment or balk isn’t helpful; instead, use calm reassurances.
***PRO TIP*** Keep your key training goal in mind – your horse needs to learn that clippers equal a reward.
The first step
- Your horse looks at a pair of clippers. Perhaps you are holding them or putting them on a shelf near your horse. REWARD. Reward again if they step toward the clippers.
- Repeat as needed for a week or so.
- This step sounds ridiculous, as why would clippers, turned off, be strange? This step lays the foundation that clippers = reward.
The second step
- Move the clippers over their body while they are turned OFF. Rub them as if you were brushing them. Only work on large masses of their body, like the rump and belly, to start. REWARD often.
- Do not push things by trying to touch them if they move away. Go back to step one instead. They’re still determining if the clippers equal a reward, so step one is your priority.
- Do this for weeks if need be.
The third step
- Repeat step one and turn the clippers ON this time. Reinforce the notion of clippers = reward when your horse is still or steps towards the clippers.
- Do this for weeks if needed, and return to the absolute beginning if needed. This patience will only build trust. It’s not a failure.
The fourth step
- Move closer to your horse with the clippers on. REWARD. Don’t push on if they’re stepping backward.
- Repeat ad nauseam.
The fifth step
- Rub the clippers on your horse while they are ON. Offer tons of rewards.
- Do this for weeks. Start over if you need to.
The sixth step
- Try clipping a small section of your horse’s side! A tiny amount. Throw them a REWARD PARTY.
- Your horse should try to rip the clippers out of your hands and clip themself to earn those rewards.
- Most horses can work through this system in a few weeks, sometimes longer. Be patient and start over as necessary. The reward system gives your horse a reason to trust you instead of being bullied or drugged into clipping.

Letting your horse have a break and a snack makes clipping much easier. For everyone! Hang hay nets in your clipping area so they can snack as you work.
Guide to Horse Clipping – Make Clipping Stress-Free
- Now that your horse is BFF with the clippers, it is time to make the clipping process comfortable and low-stress for your horse. Clipping can take hours, depending on your pattern, and sometimes boredom sets in for everyone.
Keep your horse comfortable with these handy tips:
- Make sure they are physically comfortable.
- Do they have slack in the crossties to look around and adjust their head and neck?
- What are they standing on? Mats are more comfortable than hard footing.
- How full is your horse’s belly? They don’t have to be stuffed to the brim, but they shouldn’t have delayed feedings to finish the job. Hay nets are a wonderful distraction.
- Keep their freshly clipped areas covered if the weather is chilly! Sheets are good to use here; fold the sheet to work under it. You can also use coolers, but fleece and wool’s fuzzy nature makes it attractive for loose hair to get stuck.
- Take breaks! Pop your horse in their house to drink, chill out, and have a bathroom break. Same for you, too.
- Keep your hands and eyes on their body language as you clip. Tickling is likely; your horse will appreciate a scratch or brush if they become extra twitchy. Don’t spend too much time with the clippers in a sensitive area.
Tools for Clipping – Choosing the Best Clippers
Shears, clippers, or trimmers?
- Even if you never plan on body clipping your horse, having a good set of clippers is a good idea. They are handy for wounds, touch-ups, and bridle paths. But should you get shears, clippers, or trimmers? What’s the difference?
Shears for horses and other farm animals
- Shears are heavy-duty livestock clippers that can practically cut through anything. Many professional clippers and grooms use this style for the ease of quickly clipping many horses. The blades are wide; the motor is powerful.
- However, because of these shears’ size and heft, you will find that they are usually inappropriate for clipping legs, faces, and tighter spots. Body clippers are more suited there.
- Most shear styles of clippers are corded, and some cordless models exist. They tend to be heavier than body clippers, so working with them requires practice and sometimes stamina.
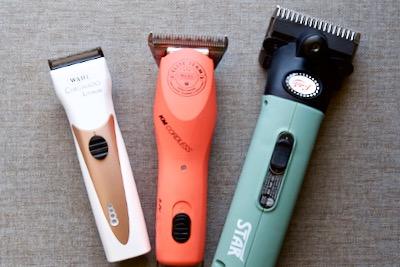
This is the Chromado trimmer, the KM body clipper, and the heavy-duty Lister Star shears.
Reasons to use shears
- Use shears when your horse’s coat is wildly thick. Shears cut through even the thickest fur with little effort. Many horses with PPID (Cushing’s disease) need help managing their longer and thicker coats all year. Shears make this job quick and easy.
- Shears are typically corded, so you don’t have to charge or switch batteries. There are newer cordless versions available.
- Shears are great if you trace clips and want to leave fuzzy faces and furry legs.
- When you need to clip many horses, shears will save you time.
This video has awesome info on how to set up your shears.
Body clippers
- These types of clippers are corded or cordless. Most come with detachable blades that sometimes work between brands. There are a few models of body clippers that use adjustable blades that are screwed on.
- Body clippers are mid-size and more flexible than the shears but not as agile as the trimmers. The power level is also mid-range. Traditionally, the cordless varieties are slightly less powerful than the corded models, but that’s not the case with newer versions.
- These clippers also act like trimmers for small areas and can cover larger areas while body clipping.
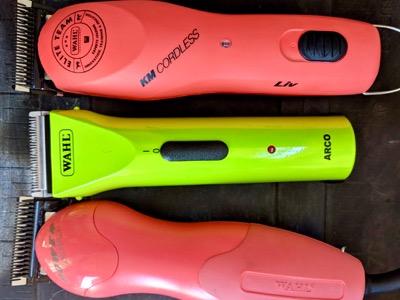
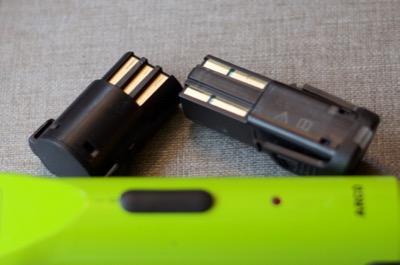
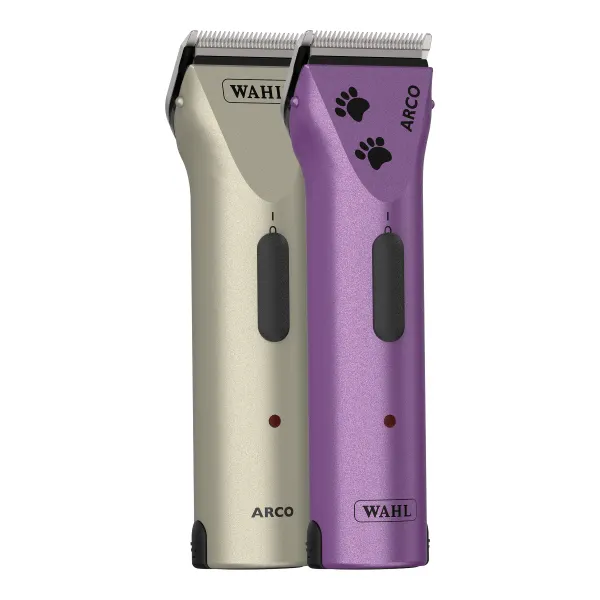
Top to bottom – KM Cordless body clippers, Arco trimmers, and the Power Grip.
Reasons to use clippers
- Clippers are great for body clips, trace clip variations, making large designs, and clipping patterns on your horse.
- These styles are also powerful enough to roach manes.
- Clippers can trim wounds and act as trimmers, although you may need to change the blades depending on what you use them for.
***PRO TIP*** Use a water-based lubricant on the wound before you clip to prevent stray hairs from jabbing the injury. This protection rinses away.
Horse Trimmers
- These lightweight and nimble clippers are for touch-ups and details. Most are cordless, and some even have removable batteries.
- Trimmers with internal batteries can often charge while you trim.
- Trimmers are great for wound cleaning, bridle path trimming, the edges of ears, and around tail tops. Bang tails with trimmers for the sharpest cut possible.
- Trimmers are also great for fancy rump designs on horses. Their small size makes it easier to “draw” on your horse.
- For legs, you can easily trim up coronary bands and around fetlocks. You don’t need to go all the way to the skin.
These trimmers work quickly on detailed areas, like lower legs. These are the Creativa in black; their curved body is great for lower legs and doggos.
Reasons to use trimmers
- If you are never body clipping, trimmers are all you need and are more cost-effective than clippers or shears.
- Cordless and lightweight trimmers come in a few styles. Trimmers with internal batteries can be charged on a stand, or use a cord to charge as you work. Removable batteries can charge on a stand, and buying replacement batteries is affordable.
- Most trimmers come with adjustable blades that allow you to change how much hair is removed! This 5-in-1 blade system goes from a #9 blade to a #40.
Tools for Clipping – Blades and Blade Combs
- When your clipper style is selected, it’s time to choose the best blades. The blade size determines how much hair remains on your horse.
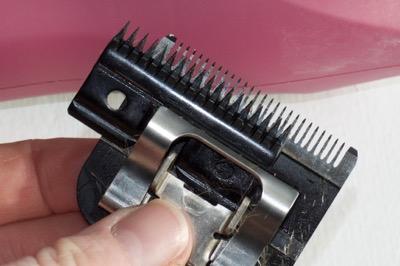
Clipper blade parts
- Every blade is two pieces – the clipper and the comb. These glide side to side, making the teeth move back and forth to cut the hair.
- The clipper and comb only touch in a few places to reduce heat from friction.
- The blades for shears are two separate pieces, but the blades are joined for clippers and trimmers.
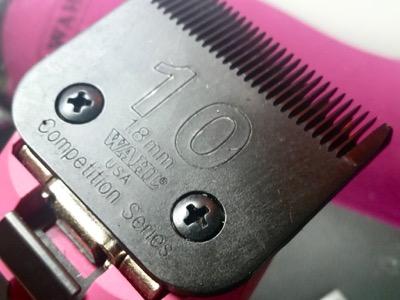
These #10s indicate they leave 1 mm of hair. These are the Ultimate Competition Series.
Clipper blades for shears
- Shears have heavy-duty blades, which come in two pieces and screw into the clipper body. The blades are broad and have fewer teeth than other blade systems. This allows thicker hair to fit into the blade.
- You will see blades for this style of shearing clipper labeled as Surgical, Fine, Medium, Coarse, or Covercote. These labels are a fancy way of describing how much hair remains instead of using numbers.
- Surgical blades leave 1 mm of hair on your horse. This is much too close for anything other than a medical reason.
- Fine blades also cut quite close, leaving about 1.4 mm of hair.
- Coarse and medium blades each leave about 2.5 mm of hair, and the medium blades are for horses. The coarse blades are better for cows and other livestock. These blades are roughly equivalent to a #9 detachable blade.
- Some shears have Covercote blades, which leave 5 mm of hair. For horses that need a “little bit off the top,” this is the blade system for you!
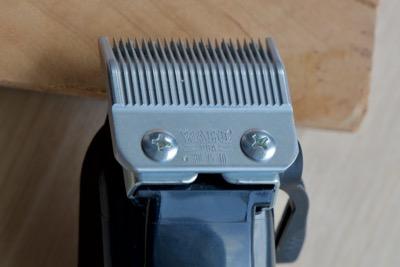
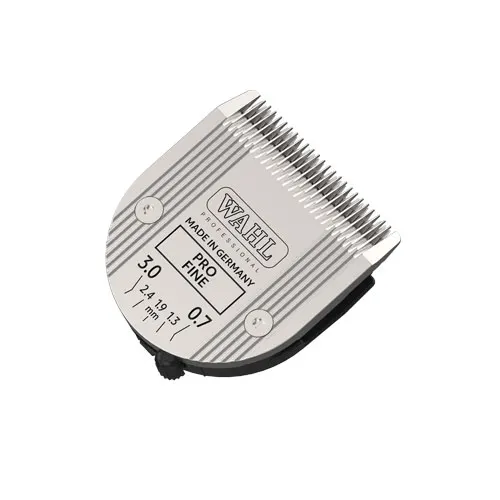
How clipper blades are labeled – clippers and trimmers
- Blades for trimmers and body clippers have numbers.
- The higher the blade’s number, the more hair it removes.
- You usually find blades between #7F and #40 in the horse world. The #10 is typical for body clipping. You would use a #30 or #40 to remove as much hair as possible for treating wounds.
- Each number correlates to the length of hair that remains. Blades usually have the number and the length of hair remaining in millimeters stamped on the blade.

This shows a #10 wide for body clippers, a fine set for shears, and a 5-in-1 for trimmers.
Sizes of blades and how much hair remains
This list is a rough guide, as manufacturers may vary, regarding how much hair remains or the numbering system.
#5F: Full Coarse – 6 mm (15/64″)
#7F: Medium – 4 mm (5/32”)
#9: Medium – 2 mm (5/64″)
#10: Medium – 1.8 mm (1/16″)
#10W: Extra Wide – 1.8 mm (1/16″)
#15: Medium Fine – 1.5 mm (3/64″)
#30: Fine – .8 mm (1/32”)
#40: Surgical – .6 mm (3/128”)
#50: Ultra Surgical – .4 mm (1/64”)
How shears attach
- The giant clipper and comb for horse shears stack into the clipper body and have a central screw that secures the pieces.
- A tension knob tightens the screw and requires adjustment for ideal clipping.
- Some body clippers use a similar system, like the 10-15-30 blades of some clipper styles. You are more likely to see this type in the barber world, but there are models for horses.
This body clipper has a screw-in type of blade, which adjusts with that lever you see on the right. It moves from #30 to #15 to #10, and these are the Pro Ion clippers.
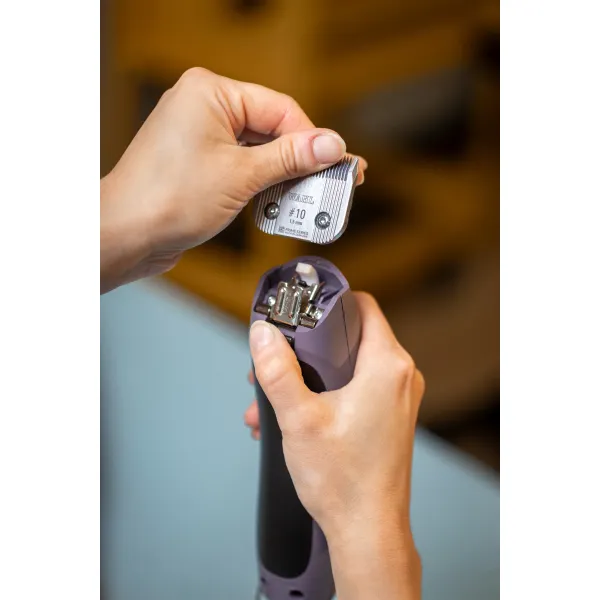
Detachable blades for body clippers
- Detachable blades snap on and off your clippers. There’s a hinge that flips out, and you can slide different-sized blades on and off.
- As with the shears, there are lots of different sizes available. You will typically find #7F to #40 in the horse world, while the dog grooming world has other blades that work well with specific hair types.
- Most horse owners have blades that range from a #10 to a #30. The #10 blade is typical for body clipping, and the #30 is excellent for wounds, bridle paths, and small trimming jobs on your horse. You can also find a WIDE #10 blade with increased blade coverage, thus making your job much faster.
- You may also find the T84 and the T10 blades. These broad blades are also detachable and roughly correspond to a #9 and a #10. The manufacturer branded them as “T” blades, and they fit other clipper bodies with a detachable system.
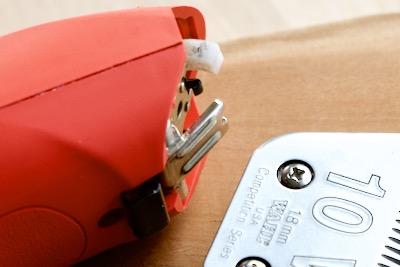
The detachable blades slide onto the metal hinge on the clipper body and snap into place. Turn your clippers on before you snap them in!
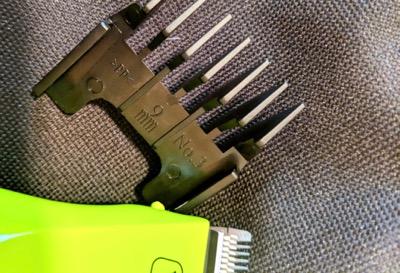
Blades for trimmers
- Most trimmers have a 5-in-1 blade, which is adjustable with your thumb. Moving the lever at the blade’s base gives you a #9, #10, #15, #30, or #40.
- If you are still deciding which length to start with, go with the #9. You can always remove more hair later.
- Sharpening these blades is difficult as the teeth are short and thin.
- You can also buy non-adjustable blades for smaller clippers and trimmers in various sizes.
***PRO TIP*** When changing detachable blades and 5-in-1 blades, turn the clippers on before you click them into place to ensure everything lines up correctly.

This is a 5-in-1 blade on an Arco trimmer. That little black nub near my thumb is how you adjust the blade length, from #9 to #40. Clever!
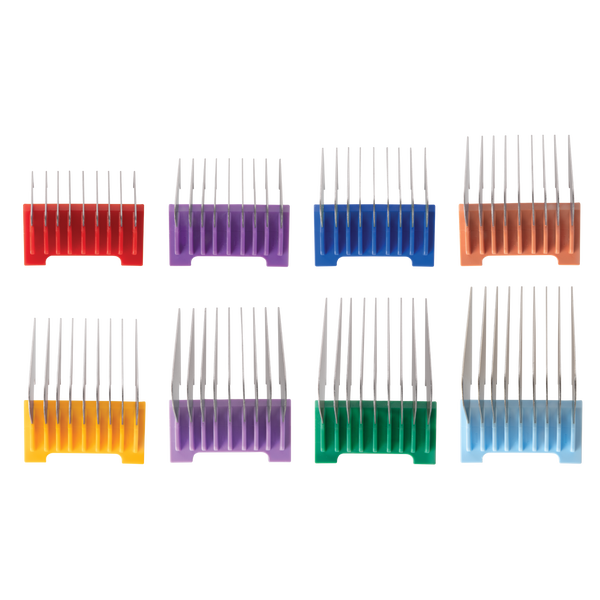
Accessories – blade combs
- Clipper guards, also called clipper combs, give you more flexibility.
- Clipper combs are slide-on attachments that provide an extension of the clipper blade. The comb rests on your horse, setting the blade away from the hair.
- Most combs or guard sets come in various sizes so that you can get the perfect cut.
- For thick winter coats, you may not want to trim everything. Combs provide a way to work towards an even finish while shortening the hair.
- When tidying up, you can also use combs to touch up lower legs, blending legs, and around cheeks and jaws.
Combs come in many sizes and slide over the 5-in-1 blade. There are also styles for detachable blades.

Must-Haves: Coolant, Clipper Oil, and Sanitizing Spray
- Coolant and clipper oil are essential for a clean clip on your horse.
- You want to use coolant and oil as a team, stopping every five minutes as you clip to:
-
- Turn the motor off.
- Brush or wipe away hair.
- Spray with coolant.
- Reapply clipper oil.
- Coolant will remove heat from the blades and blow out gunked-up hair, which helps. BUT – it evaporates quickly! The evaporation leaves your blades unprotected.
- Always add oil after using a spray coolant.
The importance of clipper oil
- I literally can’t stress this enough – your blades need to remain oiled at all times. Otherwise, you create heat, damage the blades, and make the whole clipping experience uncomfortable for your horse as the blades pull the hair instead of cutting it.
- Clipper oil is the solution to most clipping issues. As it sticks to the blade components, it flushes out bits of dust and hair that can interfere with the comb and cutter’s side-to-side motion.
- Oil also reduces the friction between the comb and cutter, which helps your clipper motor work effectively.
Clean your blades with sanitizer
- You can clean your clipper blades with a sanitizer after clipping.
- Sanitizer cleans the blades and makes them safe for use on another horse or clean for storage.
- Let this sit for a few minutes, then wipe away.
- Not surprisingly, you will need to add oil!
- The clipper oil saves your blades from inevitable demise by rust during storage.

This is Blade Ice, to be wiped off and followed by oil. I think oil is the secret of the horse-clipping universe!
How to Prep Your Clippers
Check your equipment for safety and cleanliness
- Part of a successful clip rests on the cleanliness and sharpness of your clipping tools.
- Check all of your equipment before you begin. Are the clipper cords, batteries, motor, and blades in order?
- The blades should be sharp, rust-free, and ready to snap into a properly functioning clipper body.
- Oil the blades before you begin! Drop oil on the teeth and areas where the comb and cutter touch. You can see these areas when you view the side angle of your blades. Dab a dot of oil at these intersections on each side.
- For shears, you must tension the blades and add grease to the clipper body and oil to the blades. Grease is usually placed into a hole where the clipper blades and body meet.
- To tension shears, use the knob to tighten the blades together. When the knob becomes distinctly much more challenging to turn, stop. You will reverse the knob’s direction 1.5 times around. Double-check with the manufacturer of your shears for specifics.
- Have your coolant, clipper oil, some brushes to clear hair from the blades, and some rags handy before you begin.

These Lister Stars have a tension knob that is marked for easy “backing-up” when tightening the blades.
How to Prep Your Horse for Clipping
- Before you ever start clipping your horse, they need to be ridiculously clean, as if they’ve never been that clean before in their entire life. Ideally, they’re also a little oily! Just like your clipper blades.
- Your plan should look like this:
-
- Clean your horse
- Make your horse slippery and oily
- Make your clippers oily
Groom, bathe, and dry your horse
- Every speck of dust and dirt on your horse will dull your clipper blades, create heat, and make the motor lag. You will start yanking the hair, leaving clipper lines, and be generally displeased with the process.
- Curry comb your horse as you have never curried before. And then do some more.
- Add a vacuum into the routine to lift the remaining dust and dirt.
- Use your dandy brush to flick away the dust and dirt.
- Use a damp cloth or brush to lift the dust if there’s static in the air.

You can’t go wrong currying the snot outta your horse before a bath. You can use these HandsOn Gloves dry or wet, too. Use Code PEG for free shipping.
Bath time
- Pick a gentle, horse-friendly shampoo and avoid all detergents and stain removers. These strip all of the natural oils from your horse.
- Who cares about stains – you are about to clip them all off.
- Retaining your horse’s natural oils acts like clipper oil, making it more comfortable for your horse and ensuring the best result.
- For dry coats, use a conditioner to soften the hair.
- Rinse several times to remove all residue.
***PRO TIP*** Use a sweat scraper to scrape off the first shampoo layers when your horse is soapy. This shortcut means you are rinsing less, and the bath is much faster!
Let your horse dry – without rolling
- This may require walking them, using coolers, and buffing them with towels. A good buffing session also helps to eliminate any post-bathing itchiness that may pop up.
- Distractions with hay nets or hand grazing help, too.
Hot towel your horse if bathing isn’t an option
- Hot toweling uses washcloths in hot water to steam and curry your horse clean. It can be time-consuming, but it will help the clipping process.
Here’s how to hot towel your horse in winter:
- Gather a bucket with hot water and a separate bucket with cold water for rinsing.
- Also, gather rags, no-rinse shampoo, and a cooler if your horse gets too damp. You may also want kitchen gloves.
- Mix a few capfuls of no-rinse shampoo with about two gallons of hot water. Toss in your clean cloths or rags.
- Pull out a rag and wring it until you see stars. It should be steamy and barely damp.
- Use this cloth to curry your horse in small sections.
- When the cloth is cool or your rag is dirty, toss it into the cold to rinse and cycle back to the hot.
- Cover your horse with a cooler if they get too damp. The hair should not be wet.
Hot water kettles are the BEST to have in the cross ties. Grooming in cold weather will never be easier!
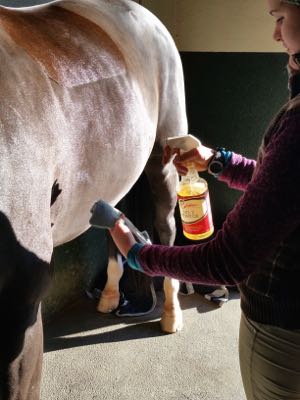
Do you need to add sheen spray or grooming oils before clipping?
- Adding a sheen spray or grooming oil to the coat may help the clippers glide through the coat unless you use too much. A clean horse and sharp clipper blades are the best plan, and add a sheen spray if you like.
- The theory is that the slick hair helps the clippers, which it can! Be warned that some sheen products have a lot of additional alcohol, which can dry the skin and coat.
- Another alternative is using a grooming oil. These oils act as a deep conditioning treatment by softening hair and adding shine. Grooming oils won’t dry the coat and act like a horse-friendly clipping oil.
- Grooming oils go a long way – there’s no need to soak your horse. Use a capful mixed in two gallons of water to hot towel the mixture into the coat.
- Nothing should feel greasy.
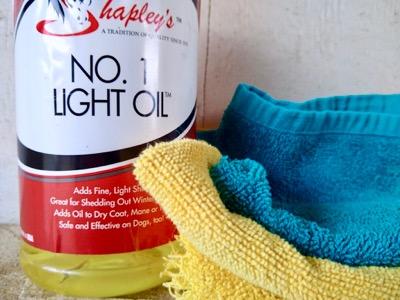
This is the best grooming oil, No. 1 Light Oil. A little bit before clipping to help your clippers, and a little bit after clipping to bring back shine.
Post-Clipping Skin and Coat Care
It’s time for elbow grease
- A lot of stray hair and dander remains on your horse after clipping. It’s time to do some currying, brushing, and rubbing down. You can also rinse your horse if the weather is good.
- You could also let your horse roll, then rinse off the rolling goodness.
- Grooming and a diet chock full of nutrients and omega-3 fatty acids are the key to bringing back the color and shine after clipping.
- Add horse products to supplement the elbow grease.
Color changing magic
- Chestnut horses, blacks, and bays often look weirdly dusty and mousy after clipping.
- You can use color-enhancing shampoos to boost some color back into your horse.
- Apply the colored shampoo and let it soak for 10-15 minutes on your horse. Then you can rinse.
Hot cloth with grooming oil to restore shine
- Conditioners and oil treatments are also a good idea after clipping. These soften the chopped hair and add a bit of shine.
- To use grooming oil, follow the hot toweling instructions, but use grooming oil instead of no-rinse shampoo.
- The first step is mixing a few grooming oil capfuls into approximately two gallons of hot water.
- Toss in some rags and swirl them around. The oil and water are like salad dressing – it needs a good shake to use.
- Wring out a cloth until within an inch of that rag’s life and use that to curry your horse. Massage that steamy grooming oil into the coat.
This article has the scoop on the many different ways to oil buff your horse.
Mayo as an alternative to grooming oils
- Mayonnaise is one option as an overnight deep conditioner instead of a grooming oil.
- Simply coat your horse in mayo and cover your horse with a sheet. Let it marinate overnight.
- The smell, mess, and need for a bath the next day outweigh the benefits.
- At least with grooming oil, you don’t need to bathe your horse.
Be sun-smart
- Clipping reveals pink skin under white hair. Even in the winter, UV rays can damage and burn that delicate skin.
- Use sunscreens on faces with pink skin.
- Fly masks, sheets, and boots help provide some UV protection.
- You can always choose a blade that leaves more hair if you are concerned about sun damage.
How to Clip a Horse – General Techniques
- Here are some general tips on how to make clipping easy for your horse. And you.
- As you start clipping, work on the larger areas of your horse first. These are less likely to be ticklish and allow your horse to settle in.
- Keep one hand on your horse as you work. Even if you are busy clipping upside down in a pretzel shape, you can feel their body language when you can’t see it.
- You will usually be clipping your horse’s hair against the direction of the hair growth. Diagonally, even! This variety allows the blades to skim under the hair and produce a crisp cut. There will be plenty of times that you will need to break this rule. Smaller areas, whorls, and awkward spots won’t follow this guideline.
- Use the “squish and move” technique to clip around whorls, loose skin, and bony parts. Gently press the skin with your free hand and slide it over. The clippers can then move across taut skin.
- Stop clipping every five minutes. Brush any hairs from your tools, and check for hot blades. Clipper coolant is excellent to use: this allows you to blow out the bits of hair and cool the blades. You must follow with fresh clipper oil!

This is the “typical” way to maneuver your clippers – against hair growth. Chuck this right out the window if you need to.
Horse Clipping Techniques For Faces, Legs, and Tricky Areas
- Keep safety in mind. As you work around some of the challenging areas of your horse, stay safe.
- Enlist the help of a friend to distract and monitor your horse as you work if your horse is wiggling.
- Use your hand to cover their ears, eyes, and nostrils as you clip close to those areas. You can also hide their forelock, so it’s not accidentally clipped off if your horse moves.
- Stepstools are ideal while clipping faces and rumps. Your field of view is better, and your arms won’t get so tired.
- Don’t assume your horse will be chill when the clippers start on their face. Take your time, and don’t press the issue. Work on desensitization instead.
- Throw out the “against the growth” rule about clipping. One way to discover how many cowlicks your horse has is to clip them.
***PRO TIP*** If you have a friend helping you, both of you should be on the same side of the horse. If you and your friend sandwich your horse, a spook will take out one of you. If you are both on the same side, that’s two more hands to communicate with them.

A step stool will help save your arms and give a smooth finish along the topline areas.
Tips for clipping your horse’s face
- Only clip what is necessary. Some horses wear a grazing muzzle or cribbing strap. Leave the hair where any straps touch your horse to prevent rubs. If the hair itself causes a problem, you clip it off. Leave the hair on your horse’s face if the weather is horrible!
- Creating a half-face is another option. All of the hair in front of the bridle’s cheekpieces remains. They may look funny when your horse is naked, but the cheekpieces cover the line when you are riding.
- Let your horse keep their whiskers, eyebrows, and lashes. These specialized hairs are vibrissae and function to navigate your horse. They help with spatial awareness where they can’t see. These whiskers are critical for finding all of the food to eat.
- When clipping around the eyes, point your blades away from the eye. You will probably not be going against the direction of hair growth. That’s better than poking out an eye.

Keep blades pointed away from eyes, and cover eyes as you work around the face. This is the Creativa again, in pink. The shape is convenient around faces, too.
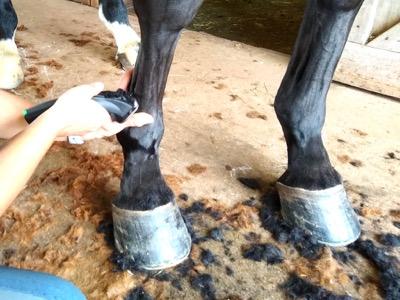
Tips for clipping your horse’s lower legs
- The lower leg has taut skin! Your clippers will run smoothly if you pick up the lower leg and clip. Face towards your horse’s nose as you pick up the leg to make this happen.
- To tidy up the spaces between the tendons, employ the “squash and move” technique to shift the skin when the leg is on the ground. Trimmers are best for this area.
- You can leave the lower legs long and blend the clipped upper leg. Use combs if you have them, and point your clippers down. Use a raking motion with the direction of growth. Start high on the upper leg to give yourself room to mess up and try again.
- Knees and hocks have tight hair that will slow clippers down. Don’t use the entire width of the blade for these areas. Work in smaller stripes using the outer portion of the clipper blade. You will make more passes, and the results will be better.

This is the one way to clip around the tendons.
Tips for clipping your horse’s skin folds and elbows
- Have a friend help you! The elbow area is full of nooks, crannies, and skin folds.
- A helper can stretch out the front leg to allow you access the area. Pair this with some squishing and moving of skin to get it all. Throat latches are another area where it’s nice to have extra hands.

Squish down on any loose skin and slide it over so you can maneuver your blades around.
Tips for clipping around the girth area
- One of two things happens around the girth. The extra winter hair protects the skin from rub marks and sores. Or, the excess winter hair gets pulled and can even act like an abrasive. The hair rubbing can create rubs and painful girth galls.
- Leave the hair long to see what happens if your horse is sensitive in the girth area. You can always clip it off later.
- Anti-friction sticks are great to use around the girth to prevent rubs. It can get goopy for long coats and generally works best for shorter coats.

These deodorant-like sticky help keep rubs away! They work best on short or clipped hair.
Preparing for a Trace Clip – Tips for Clipping Lines and Designs
- Clipping lines to outline trace clips and a saddle patch can be tricky. Adding designs to your horse’s shoulder or rump is fun but tricky. But not with these tips!
- There is a simple process for creating fuzzy saddle pads, lines, and designs. This technique is convenient if you are doing a trace clip or any clip that requires a transition between long and short hair.

This paper stencil was printed on regular paper and secured with tape, creating a border to outline.
Draw it out – create an outline or border
- Depending on what you have on hand, you can “draw” lines and borders on your horse. There are many ways to do this:
- Use a marker to trace a half-pad on your horse.
- You can also use chalk, tape, or stencils to give yourself some guidelines. With stencils, use a bit of tape to keep them in place.
- For straight lines, have a friend hold some baling twine to use as a guide.
How to clip the border or outline
- Use clippers or trimmers set to a #30 or #40. This blade setting makes the outline crisp and clear.
- Hold your clippers like a pencil and use the corner of the blade along the twine, stencil, or marking.
- Carve guidelines into your horse with your pencil.
- This technique works well for complicated designs and gives you a definitive edge to outline your trace clip.
- Now, you can start clipping out the design on your horse. Remember to switch the blades to a #10 after you finish the borders.
- If your horse has some remaining marker lines, grab a damp cloth to wipe them away.
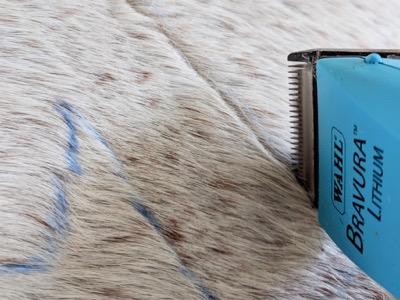
This Bravura trimmer is set to #40 in the 5-in-1 blade, and I’m holding it like a pencil to outline a design.
How to Clip a Horse: Common Clipping Issues and Solutions
- Dozens of factors influence the final result; sometimes, things don’t go as planned.
- The three significant troubleshooting areas are your horse’s prep, the clipper body and motor, and the blades. More often than not, it’s a combination of prep and blades, with a little bit of practice tossed in.
- Here are some common clipping obstacles and how to correct them.
Trouble with Clipping Techniques
- You may run into some clipping issues related to skill and technique. Never fear; keep practicing after you address the following problems.
Your clippers are pulling the hair and not clipping smoothly
- You may even feel the sensation that the clippers are catching along your horse’s skin. The pulling and catching means you have one or more of the following:
-
-
- Dirty horse
- Dirty blades
- A clipper motor that needs servicing
- Not enough oil on the blades
- Dull blades
-
- When dust, dirt, and dryness muck up the blades, they create friction, produce heat, and damage the teeth. Coolant and clipper oil help with the temperature, but it’s time for new blades if the teeth are dull and damaged.

REALLY – OIL is the secret.
The clippers create waves and uneven hair
- You may be making sand dunes of hair on your horse. Or, there are spots where you dug into the coat.
- Dirty horses and blades usually cause this.
- Keep the blades consistently angled as you clip; this takes practice.
- Use a stepstool to help you see and navigate your horse’s upper half.
- Keep loose skin taut as you clip by squishing and sliding the skin.
You have clipper lines
- There are a few reasons for clipper lines to appear.
-
- Dirty horse
- Dirty blades
- A clipper motor that needs servicing
- Not enough oil on the blades
- Dull blades
- Seems familiar, right?
- It’s perfectly fine to ignore lines! The lines will disappear as your horse continues their natural hair growth cycle.
- You can smooth the finish by clipping an X over any lines.
- Removing lines is the perfect example of disregarding that “rule” about constantly clipping against the hair growth direction.

Uneven lines and divots! It’s just practice to prevent this.
Trouble with Equipment – The Clipper Body and Blades
The clippers are getting too hot, too quickly
- If you are ending up with hot blades, you shouldn’t be. All of these are culprits. This is, most definitely, a theme.
-
- Dirty horse
- Dirty blades
- A clipper motor that needs servicing
- Not enough oil on the blades
- Dull blades
- Hot metal means it’s working too hard! Dirt, friction, and dull blades make the heat. Get it all clean and oiled up, and you should be ready.
- If the problem persists after spotlessly grooming your horse and attending to the blades, tend to the battery if cordless and service that clipper body.
These are batteries that pop out and charge on a stand. You can get replacements!
Your clipper batteries are lagging
- Most cordless clippers have batteries that can be replaced as needed. It’s just how batteries are! You can buy replacement batteries that pop out of the clipper body.
- For internal batteries, have the clippers serviced.
- Some cordless clippers can charge and run at the same time. The charging cord fits directly into the clipper body or a charging stand. Use that cord to juice up the battery as you clip.
The clipper blades are rattling
- Screw-on blade systems, like the shears, sometimes create a rattling sound and may vibrate oddly, too.
- This rattle means the blades need to be tensioned! For shears, follow the guideline of tensioning the knob until it’s taut, then back out 1.5 rotations.
- Tighten or loosen the screw-on style of blades for the 10-15-30 style. Use a screwdriver.
- In both situations, clean, cool, and add oil and grease if applicable!
- If your shear blades become super hot in a short amount of time, it means they are too tight. Go through the same steps to tension the blades.
You hear weird noises from the clipper body
- Expect clipper body noises when the detachable blade isn’t attached correctly to the hinge!
- Did you turn the clipper on before snapping the blade into place?
- The fix may be as simple as putting it on again.
- First, slide the blade on the hinge, turn the motor on, and then pop it into place.
- There may be a problem with any of the inside parts as well. When was the last time you serviced your horse clippers?
- There’s a little tip that slides back and forth on the blades. This drive tip wears out and can be easily replaced. Some clipper models come with replacement tips to pop in. The drive tip should have square corners. Change the drive tip when the corners are very rounded.

When this white blade tip starts to wear down and round out, it’s time to replace it.
Here’s how to change the drive tip.
Slowing of the clipper body motor
- Things slow down when the motor is challenged.
- Dirty coats are one culprit! As are filthy and dull blades.
- Ultra-thick coats also slow things down. In this case, you may need to service the clippers you have or choose a more robust model.
- Shears are more appropriate for horses with Cushing’s, thick Shetland and Icelandic coats, and even some Baroque horse coats.
- The battery may be on its way out! Does it need to be charged or replaced?
- For corded clippers, check to be sure the cord isn’t damaged. Prevent this by not winding up the cable into tight spirals or with sharp bends.
Manufacturers have service programs
- What’s easier than mailing in your clippers? You may also find someone local to you. Double-check your warranty; it may be voided if you don’t mail them to the manufacturer for service or use someone outside their recommended service providers.

Add oil! And most of your clipper issues are fixed.
Troubleshooting Steps
- Read the directions.
- Look at how much dirt your horse and blades have.
- Check for dull blades and/or rust on the blades.
- Inspect the blade drive or drive tip.
- Check the tension of the comb and cutting blades if you are using shears.
- Charge batteries and check for cord damage and wear.
- Perhaps read the directions if you skipped that part.
***PRO TIP*** Ask your veterinarian’s office where their clipper blades are sharpened and serviced. Tack shops may also have a drop-off and pick-up service.
What happens when you send your clippers in for repair?
- If you send your clippers in for service, they will most likely be dissembled. It seems extreme, but hair, dust, and oil enter the body.
- Everything needs to be inspected and cleaned. Worn or damaged parts are replaced and then reassembled.
- As a complete shocker in this process, all parts inside the clipper body get oil. Now it’s as good as new!
Cleaning and storing your clippers
- Now that your horse is cared for, it’s time to address your clippers. Before storing and between horses, clean, sanitize, and oil the blades.
Take care of the hair first
- The first step is removing all hair from the clipper body and blades. After removing the blade from the clipper body, use a brush or cloth to wipe away the hair.
- Toothbrushes get into the nitty-gritty. It’s up to you to return the toothbrush to its rightful owner.
- When working with the clipper blades, you can slide the comb and cutter apart – a little bit! They are wildly challenging to put back together, and cussing might ensue.
- I use a larger, stiff brush to brush off the clipper body. You can also vacuum it.
- Pipe cleaners are great for cleaning the hair and extra oil from 5-in-1 blades.
- Compressed air is also an option to clean the blades thoroughly, not the body. The force of the air might push more dust and hair into the clipper’s body.
Sliding the clipper parts
Wash your clipper blades
- You can do this with blade wash or sanitizing spray. This product is inexpensive, and most manufacturers have their own brand.
- For those of us in a certain age bracket, you may have grown up using kerosene as a blade wash. YIKES! Today’s blades are made of more modern materials like titanium, steel, and chromium. Kerosene will damage these metals.
The third step is to sanitize your blades
- This is especially important if you use your tools to clip more than one horse. Several skin conditions, like rain rot and ringworm, can be transmitted from horse to horse via grooming tools.
- Sanitizers, also made by several manufacturers, are a spritz-on product. Let them sit in the spray for a minute, then wipe off any excess.
Next, oil your clipper blades
- In case you missed it, oil is the magical solution to almost every clipping issue. Clipper oil will keep your blades healthy even when you aren’t using them.
- Covering the teeth with oil fends off the rust. If you use shears, these also need to be oiled and greased. There is sometimes a port where you squeeze some grease in. The instructions vary by manufacturer.
- Store your blades in a sealable container. Humidity and air contribute to rust.
- A climate-controlled area is best for storing blades.

Almost as much hair in the clippers as in your skivvies after clipping.
Sharpening Clipper Blades
- You may want to have your clipper blades sharpened before storing them. But there are a few things to know about this! It’s not straightforward to “get your blades sharpened.”
- Assuming your horse, clippers, and blades are pristinely clean and oiled, you may find that they still tug on your horse’s coat. You likely have dull blades.
- Clipper blades can only be sharpened until the teeth run out of metal to sharpen. Tiny teeth have little metal to work with. Compare that to the giant blades of the shears, with extra long teeth and lots of room between to sharpen.
- It isn’t easy to sharpen the 5-in-1 style of blade. You may find a craftsman who can help in your area. Some manufacturers have services to help with these blades.
- Standard #10 blades usually have a few sharpenings before needing replacement.
- Spent blades can have a second life as a mane-shortening comb. You can create a natural finish on the mane without pulling the mane out.

More Horse Clipping Tips
- If you would like to learn with the help of an experienced clipper, ask! An in-person lesson can help you with skills.
- Protect your skin and clothing from stray hairs and dust. Many professional grooms wear masks and have their favorite clothes to keep hair at bay. Finding clothing that is slick and not woven is critical! Look for fabrics similar to a hair salon cape or snow pants.
- Give yourself ample time. If you are still determining how long it will take, double your estimate.
Enjoy this quality time with your horse! And be amazed at how comfortable your horse is after their clip.
Videos
Enjoy these videos on how to clip a horse!
Choosing shears, body clippers, or trimmers:
Choosing clipper blades:
How to tension shears:
Hot toweling your horse before clipping:
Make crisp lines on your horse for trace clipping:
Clipping ears:
Clipping faces:
Tips for clipping legs:
How to clip a horse – add a design:
Clipping tricky areas:
Hives after clipping?


Download this free guide to horse clipping here. I won't ask you for anything like your email or phone - who has time for that noise!

Go shopping!

Stock up here for your horse supplies! As an Amazon Associate, I earn from qualifying purchases, but it’s ZERO extra cents to you. As a Walmart Associate, I earn from qualifying purchases as part of their affiliate plan. Thank you for your support! You can also visit my Amazon storefront here: PEG storefront. You can visit my Walmart shop here: Walmart shop. Thank you!
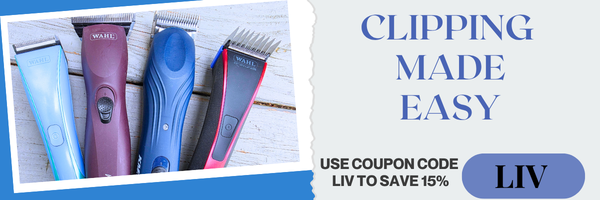
Use code LIV for savings at wahlpro.com
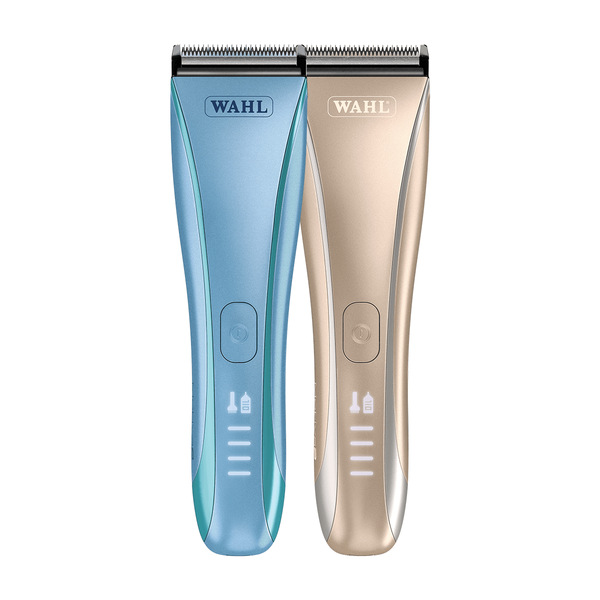
- Cordless 5-in-1 clipper for precise finishing work on horses
- Adjustable blade (#9, #10, #15, #30, #40) for flexible trimming
- Lightweight design for easy control and less hand fatigue
- Dual batteries with quick swap for extended grooming time
- Quiet, low-vibration motor for sensitive horses
- Ideal for bridle path, face, ears, muzzle, and fetlocks
Use code LIV for savings at wahlpro.com
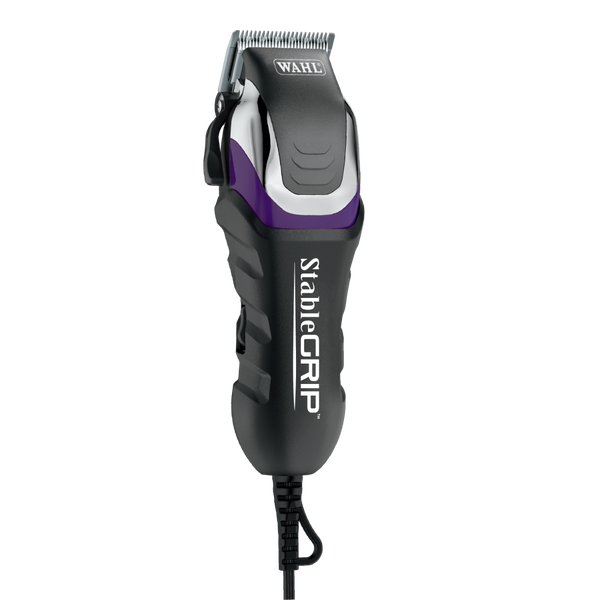
- 2-speed motor (6000 & 8000 RPMs)
- 4-hour cordless runtime + corded option
- 5-in-1 Diamond Pro blade stays cool and sharp
- Textured housing for comfortable control
- Travel lock for safe transport
- LED screen with speed, battery, and maintenance info
Use code LIV for savings at wahlpro.com
- Powerful motor glides through coats
- Textured grip for better control
- Up to 3 hours cordless + corded option
- Digital display with battery + maintenance alerts
- Travel lock for safe transport
Use code LIV for savings at wahlpro.com
- Upgraded brushless motor (3,700 & 4,500 RPMs)
- Textured housing for secure, comfortable grip
- Constant Speed Control powers through thick or matted coats
- Corded + cordless use with quick-charge battery
- Up to 2 hours cordless runtime

Use code LIV for savings at wahlpro.com
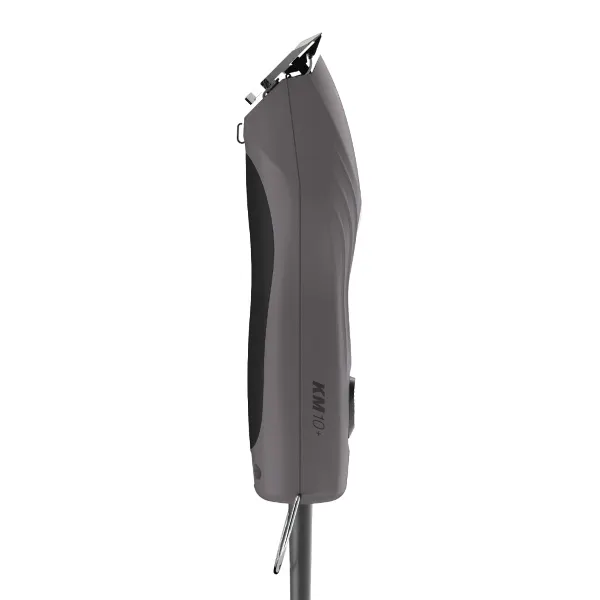
- #10 Prime Series German high-carbon steel blade for durability
- LOCKGUARD tech prevents hinge closure for easy blade changes
- Lightweight, slip-resistant design for better control
- Constant Speed Control powers through all coat types
Use code LIV for savings at wahlpro.com
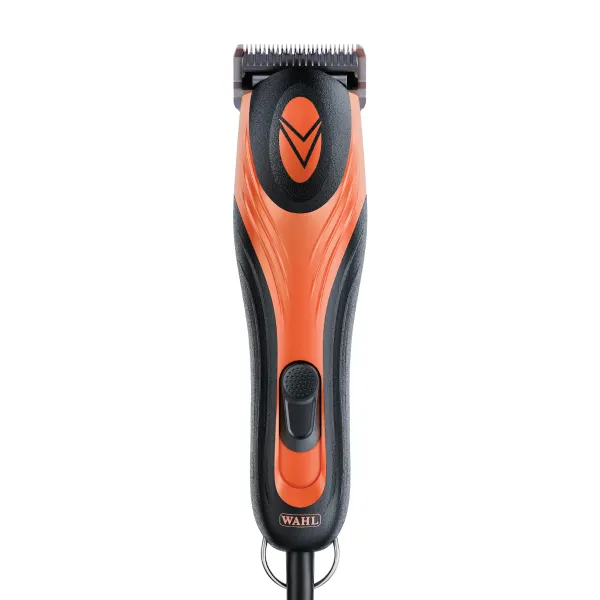
- Powerful, quiet motor with 7,200 SPM and reduced heat
- Adjustable cutting lengths (#30, #15, #10) for versatile clipping
- Lightweight design for controlled grooming and finish work
- Ideal for fetlocks, bridle path, face, ears, and detailing
- Includes adjustable blade, blade oil, and cleaning brush
Use code LIV at wahlpro.com for savings!
- Includes #10 wide Prime blade
- LOCKGUARD technology for secure blade hold
- Two speeds (3,000 & 3,700 RPMs)
- Two lithium-ion batteries, up to 3 hours each
- Wide blade version of the KM Supera

Use code LIV for savings at wahlpro.com
- Powers through all coat types with 3 high-speed settings
- #10 Prime Series German high-carbon steel blade for durability
- LOCKGUARD technology prevents hinge closure for easy blade changes
- Replaceable drive tip system for quick, simple maintenance
- Rubberized no-slip grip for comfort and full control
- Lightweight design built for all-day grooming use
Use code LIV for savings at wahlpro.com
- Powerful motor up to 6,000 SPM with cool, quiet performance
- Up to 2 hours cordless runtime with Lithium Ion battery
- Quick-adjust blade (#10, #15, #30) for flexible cutting lengths
- 15-minute quick charge gives ~10 minutes of extra use
- Ergonomic design for comfort and control during grooming
These wildly powerful shears are great for thick coats, and when I say thick, I mean it.

Use code LIV for savings at wahlpro.com!
- Keeps blades lubricated for cooler, smoother cutting
- Helps blades stay sharper for longer use
- Recommended after each use for best performance and longevity
Use code LIV for savings at wahlpro.com
- 2-minute hospital-grade disinfectant for fast, effective cleaning
- Kills bacteria, viruses, and fungi on contact
- EPA-certified formula for trusted disinfection
- Safe for grooming tools and workstation surfaces

Use code LIV for savings at wahlpro.com
Choose your favorite blade from a #7 to a #40 for body clippers like the Velocity, Supera, or KM Series.
Use code LIV for savings at wahlpro.com
- Glide-through cutting for smooth, efficient clipping on all coat types
- Easy detachment and adjustment (#9, #10, #15, #30 & #43)
- Always cool-running blade set for consistent performance
- Ideal for bridle path, ears, muzzle, fetlocks, and finish work on horses
Use code LIV for savings at wahlpro.com!
Use code LIV for savings at wahlpro.com

Use code LIV to save at wahlpro.com
